S3 Storage Classes Hands-On
This hands-on lab walks through the operational lifecycle of S3 objects.
Step-by-Step Lab Guide
Phase 1: Create the Bucket Environment
- Open your AWS Management Console and navigate to Amazon S3
- Click on Create Bucket
- Name your bucket:
rendy-s3-storage-demo - Choose any target AWS Region that works for your deployment layout and hit Create bucket.
Phase 2: Upload and Inspect the Storage Class Matrix
- Click into your newly created bucket dashboard
- Click Upload → Add files and select your placeholder asset (e.g.,
coffee.jpg) - Before hitting upload, scroll down and expand the Properties section to view the S3 Storage Class menu layout
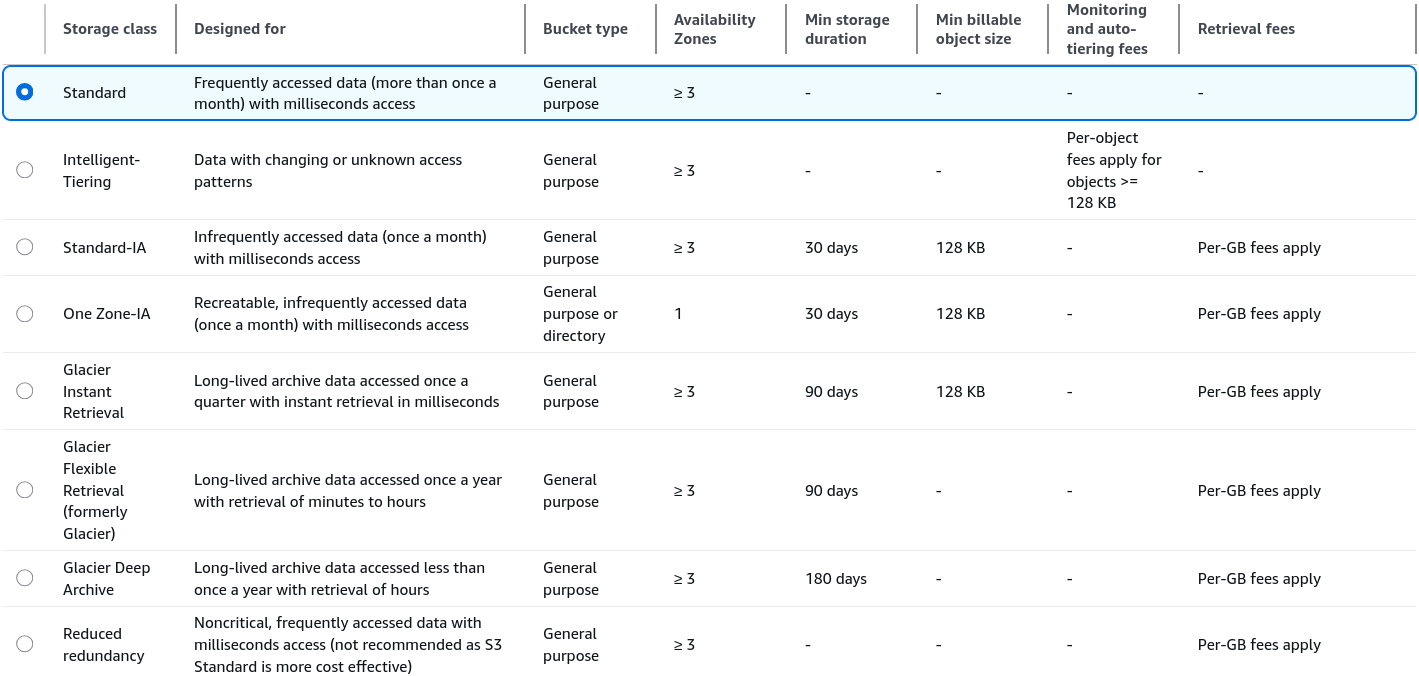
- Inspect the table of storage class option for each tier:
- Choose Standard-IA for this initial asset payload
- Scroll down and click Upload
Phase 3: Execute a Manual Storage Class Override
- Back in your bucket object dashboard, confirm that
coffee.jpgshows a listed storage tier profile of Standard-IA. - Click on the
coffee.jpgitem name link to open its individual resource metadata panel. - Navigate down to the Storage class section under the Properties tab and click Edit.
- Change the active radial checkbox selection frm Standard-IA down to One Zone-IA.
- Scroll to the bottom, review the warning indicators regarding data loss if an AZ suffers a failure, and click *Save changes**
- Confirm that the file's current state metadata has successfully flipped over to One Zone-IA.
- You can repeat this step to shift the asset into Glacier Instant Retrieval or Intelligent Tiering on the fly.
Phase 4: Configure an Automated S3 Lifecycle Rule
- Navigate back up to the root level of your bucket dashboard and switch over to the Management tab.
- Find the Lifecycle rules section block and click Create lifecycle rule.
- Configure the automated transition criteria:
- Lifecycle rule name:
DemoLifecycleRule - Choose a rule scope: Select Apply to all objects in the bucket (and acknowledge the confirmation checkbox)
- Lifecycle rule actions: Check the box that says Transition current versions of objects between storage classes.
- Lifecycle rule name:
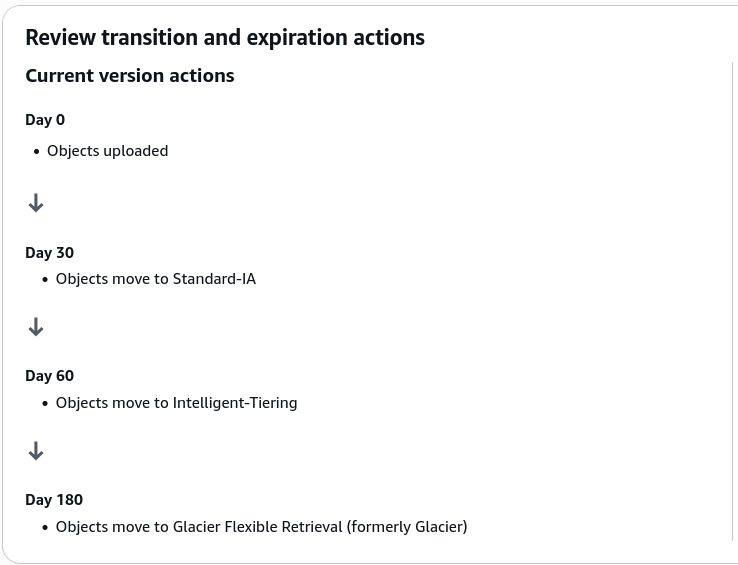
- Define your time-phases sequential cascade transition step-by-step:
- Transition 1: Choose Standard-IA from the dropdown matrix and set Days after object creation to 30.
- Click Add transition
- Transition 2: Choose Intelligent-Tiering from the dropdown matrix and set Days after object creation to
60. - Click Add transition
- Transition 3: Choose Glacier Flexible Retrieval from the dropdown matrix and set Days after object creation to
180.
- Scroll down to the absolute bottom of the creation pane to inspect the clean, summarized timeline visualization graph generated by AWS.
- Click Create rule to deploy your automated storage optimization pipeline.