S3 CORS Hands On
This hands-on lab layout walks through diagnosing and breaking down a browser-enforced Cross-Origin Resource Sharing (CORS) block. You will simulate a decoupled application architecture across two separate S3 buckets, observe how a completely public S3 Bucket Policy still fails to clear browser-level script restrictions, and deploy a custom JSON CORS Configuration Rule to explicitly open up the data pipeline.
Hands On
Phase 1: Simulate a Cross-Origin Script Block
- Bucket 1: The Frontend Web Host
- Open your Amazon S3 Console and click Create bucket.
- Name it something unique like
my-frontend-web-app-v2. - Scroll down, select Enable Static Website Hosting under properties, and upload your baseline
index.htmlfile code layout. - 📋 Copy its endpoint URL:
http://my-frontend-web-app-v2.s3-website.ap-southeast-2.amazonaws.com.
- Bucket 2: The Secondary Asset Vault
- Create a separate bucket named
my-static-asset-vault-v2. - Upload your font files, icon sets, or generic media assets (like
coffee.jpgoricons.json) into this container. - Navigate to the Permissions tab and apply a standard public read S3 Bucket Policy so the files are open to the global internet wire:
{"Version": "2012-10-17","Statement": [{"Sid": "PublicReadAccess","Effect": "Allow","Principal": "*","Action": "s3:GetObject","Resource": "arn:aws:s3:::my-static-asset-vault-v2/*"}]} - Create a separate bucket named
Phase 2: Auditing the Browser's Security Interception
- Open your browser, fire up the inspector tools (F12 or Right Click -> Inspect), and switch over to the Console tab layout window.
- Navigate to your Frontend Web Host URL endpoint.
- When your JavaScript library attempts an asynchronous script load or font fetch to grab data straight out of the Asset Vault bucket domain, the render will snap and freeze.
- The Error Readout: Your console screen will instantly throw a bright red execution exception error block matching this exact signature:

Phase 3: Deploying the JSON CORS Patch
- To drop this browser fence, toggle back over to your AWS S3 Console management window.
- Click into your Secondary Asset Vault bucket (
my-static-asset-vault-v2)—do not edit the frontend bucket! S3 CORS configurations must always be applied straight to the resource that holds the assets being requested. - Jump into the top-level Permissions tab panel.
- Scroll all the way past the Bucket Policy editor block to locate the Cross-origin resource sharing (CORS) text editor workspace container, and click Edit.
- Paste the following optimized, least-privilege production JSON rule array block directly into the document container:
[
  {
    "AllowedHeaders": ["*"],
    "AllowedMethods": ["GET", "HEAD"],
    "AllowedOrigins": ["http://my-frontend-web-app-v2.s3-website.ap-southeast-2.amazonaws.com"],
    "ExposeHeaders": ["ETag"],
    "MaxAgeSeconds": 3000
  }
]
- Click Save changes to push the rule live across the AWS API gateway control plane.
Phase 4: Verifying the Pre-flight Handshake Success
-
Return to your active frontend web application tab and hard-refresh the page payload (
Ctrl + F12orCmd + Shift + R). -
Open your browser's inspector panel and switch to the Network tab tracking utilities.
-
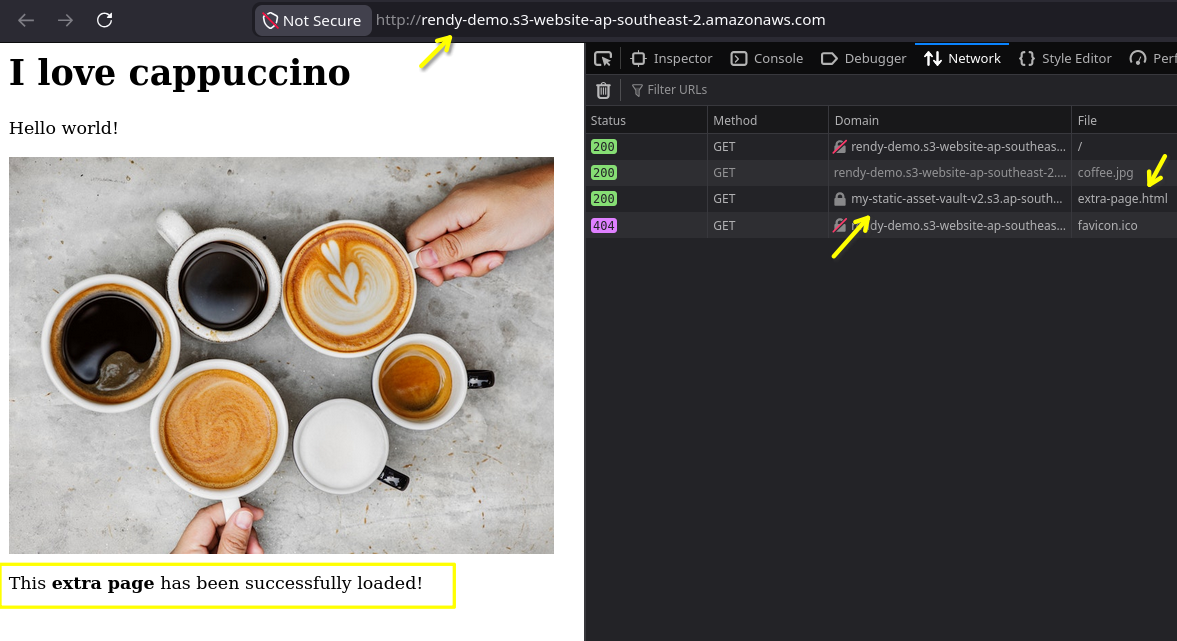
The Network Trace Breakdown:
- You will witness a background HTTP
OPTIONSpre-flight query packet fire over the wire to check validation parameters against S3. - S3 scans your attached JSON array document, matches your calling origin domain string parameters perfectly, and responds with a successful
HTTP 200 OKcarrying the mandatory authorization headers:
- The browser browser-cop immediately steps aside, clears the gate lock, executes the real data payload delivery stream, and cleanly renders your font icons onto the UI screen. The console error is officially wiped out!
- You will witness a background HTTP
Exam Tips
The Separation of Controls Law: Always separate resource access permissions from browser scripting runtime rules inside your architectural thinking:
- S3 Bucket Policies dictate whether a cloud account or a network identity is legally permitted to read or mutate a storage key. They execute entirely inside the AWS Cloud Framework Layer.
- S3 CORS Configuration Documents dictate whether a local desktop client browser engine is legally permitted to read cross-domain responses. They execute entirely inside the Client Browser Layer.
If a test question mentions an application using JavaScript (fetch, XMLHttpRequest, AJAX, or Axios) failing to pull public files across different endpoint domains, it is 100% of the time a CORS rule issue. Changing bucket policies or modifying ACL rules won't help. The absolute only valid architectural answer choice is to attach a JSON CORS policy directly onto the target asset bucket!
Practice Test
Question: A development team uses shared Amazon S3 buckets to upload files. Due to this shared access, objects in S3 buckets have different owners making it difficult to manage the objects.
As a developer associate, which of the following would you suggest to automatically make the S3 bucket owner, also the owner of all objects in the bucket, irrespective of the AWS account used for uploading the objects?
- Use S3 CORS to make the S3 bucket owner, the owner of all objects in the bucket
- Use S3 Access Analyzer to identify the owners of all objects and change the ownership to the bucket owner
- Use Bucket Access Control Lists (ACLs) to control access on S3 bucket and then define its owner
- Use S3 Object Ownership to default bucket owner to be the owner of all objects in the bucket
Correct Answer
- Use S3 CORS to make the S3 bucket owner, the owner of all objects in the bucket
- Explanation: Cross-origin resource sharing (CORS) defines a way for client web applications that are loaded in one domain to interact with resources in a different domain.
- Use S3 Access Analyzer to identify the owners of all objects and change the ownership to the bucket owner
- Explanation: Access Analyzer for S3 helps review all buckets that have bucket access control lists (ACLs), bucket policies, or access point policies that grant public or shared access. Access Analyzer for S3 alerts you to buckets that are configured to allow access to anyone on the internet or other AWS accounts, including AWS accounts outside of your organization.
- Use Bucket Access Control Lists (ACLs) to control access on S3 bucket and then define its owner
- Explanation: Amazon S3 access control lists (ACLs) enable you to manage access to buckets and objects. Each bucket and object has an ACL attached to it as a subresource. A bucket ACLs allow you to control access at bucket level.
- Use S3 Object Ownership to default bucket owner to be the owner of all objects in the bucket
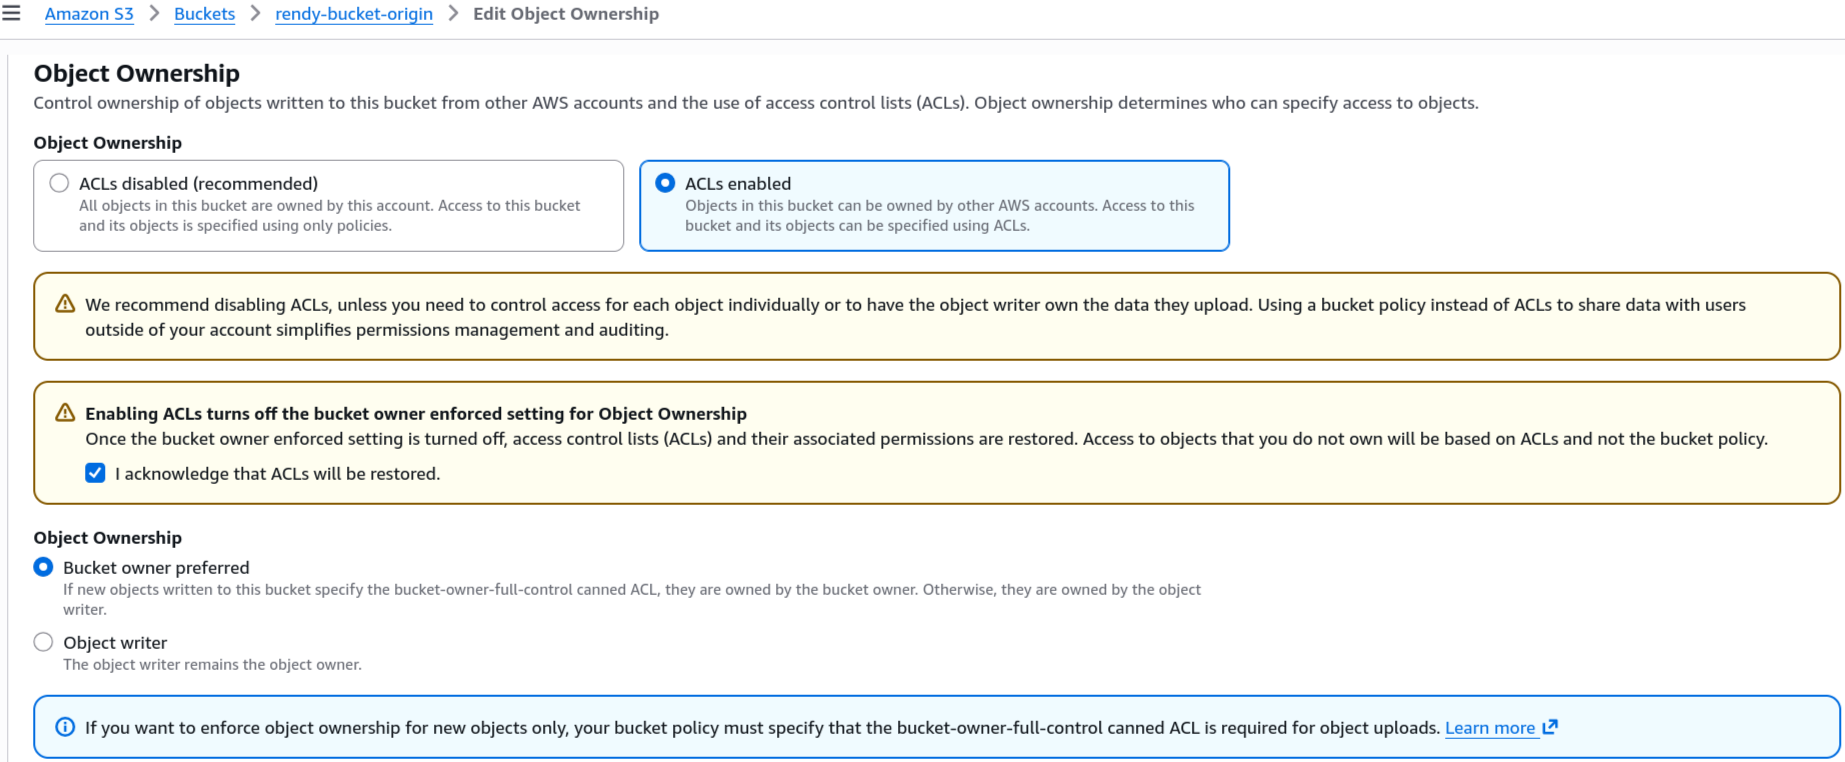
- Explanation: S3 Object Ownership is an Amazon S3 bucket setting that you can use to control ownership of new objects that are uploaded to your buckets. By default, when other AWS accounts upload objects to your bucket, the objects remain owned by the uploading account. With S3 Object Ownership, any new objects that are written by other accounts with the bucket-owner-full-control canned access control list (ACL) automatically become owned by the bucket owner, who then has full control of the objects.
S3 Object Ownership has two settings:
- Object writer – The uploading account will own the object.
- Bucket owner preferred – The bucket owner will own the object if the object is uploaded with the bucket-owner-full-control canned ACL. Without this setting and canned ACL, the object is uploaded and remains owned by the uploading account.
- Explanation: S3 Object Ownership is an Amazon S3 bucket setting that you can use to control ownership of new objects that are uploaded to your buckets. By default, when other AWS accounts upload objects to your bucket, the objects remain owned by the uploading account. With S3 Object Ownership, any new objects that are written by other accounts with the bucket-owner-full-control canned access control list (ACL) automatically become owned by the bucket owner, who then has full control of the objects.
S3 Object Ownership has two settings: