S3 Encryption Hands On
This hands-on lab maps out how to implement, verify, and override server-side encryption states using the AWS S3 Console dashboard. You will learn how to initialize a bucket under default SSE-S3 protection, trigger a dynamic encryption shift over to an identity-tracked SSE-KMS tier, examine how S3 versioning safely isolates cryptographic modifications, and verify the structural limits of console-driven encryption overrides.
Hands On
Phase 1: Initialize the Default Storage Layer
- Open your Amazon S3 Console dashboard and click Create bucket.
- Bucket name: Type
demo-encryption-rendy(or append a unique numeric identifier string). - Region: Select Sydney (
ap-southeast-2) or any regional coordinate close to your location. - Scroll to the Bucket Versioning container block and explicitly select Enable.
- Default encryption matrix: Verify that Server-side encryption with Amazon S3 managed keys (SSE-S3) is actively selected as your default out-of-the-box protection layout.
- Scroll to the absolute bottom of the creation pane and click Create bucket.
Phase 2: Upload and Inspect the Baseline Cipher State
- Click into your newly generated bucket workspace and click Upload → Add files.
- Choose your standard testing asset file (e.g.,
coffee.jpg) and click Upload. - Once the progress bar clears, click on the
coffee.jpgname link to jump into its private resource properties dashboard page. - Scroll down to the Server-side encryption settings property field block.
- Verify the State: Confirm that the metadata row displays an active security layer of SSE-S3 (AES-256), proving S3 automatically wrapped the bits using its own managed master keys.

Phase 3: Execute a Live Crypto State Override
- Inside the object's property page, scroll right back down to the Server-side encryption settings block and click Edit.
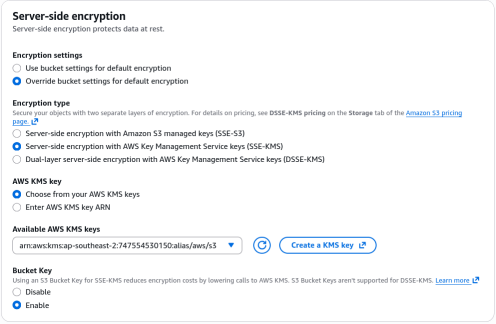
- Check the radial button to override the bucket settings and switch your encryption type wrapper over to SSE-KMS.
- Select the Key: Under the AWS KMS key configuration section, select Choose from your AWS KMS keys.
- From the dropdown list wrapper, select the system default managed key named
aws/s3. - Financial Tip: Using the default service-managed
aws/s3key profile is completely free, whereas provisioning a customized Customer Managed Key (CMK) inside the KMS console will incur a base monthly fee. - Click Save changes and close the completion window overlay.
Phase 4: Audit the Cryptographic Version History Stack
- Return to your main bucket object catalog list workspace.
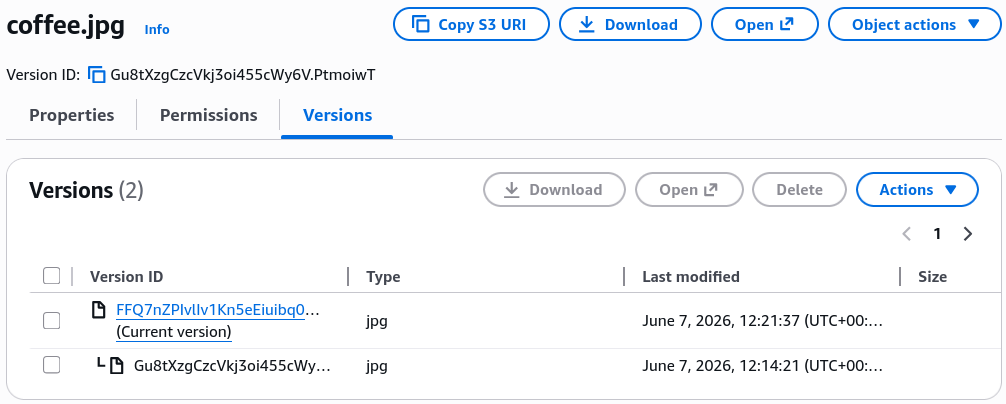
- Locate the List View Controls and flip the Show versions toggle switch to On.
- Inspect the Array Matrix: Notice that
coffee.jpgnow contains two distinct, parallel historical version entries inside the storage table index! - The Historical Lineage:
- Click the Older Non-Current Version row metadata properties Notice it still holds its original baseline SSE-S3 encryption layer header.
- Click the New Current Version row metadata properties Confirm it successfully holds your fresh SSE-KMS wrapper header bound to your default
aws/s3cryptographic key!
Phase 5: Inline Upload Overrides and Bucket Key Audits
- Click Upload → Add files, and drop a secondary asset like
beach.jpginto the upload container. - Before executing the file transfer, scroll down to the bottom of the active wizard page and expand the Properties panel link.
- Locate the internal Server-side encryption workspace and note that you can manually select an alternate encryption key target before the item ever hits the storage drive array!
- Close the wizard and click over to your global bucket Properties tab.
- Locate your root Default encryption management card and click Edit.
- Switch the global option check box over to SSE-KMS and note the appearance of the Bucket Key optimization switch:
- Leave the rule configuration screen and close your tabs.
Exam Tips
| Encryption Protocol Type | Console Management Available | S3 Bucket Key Support | Crucial Architecture Execution Rule |
|---|---|---|---|
| SSE-S3 | Yes (Enabled by default) | No (Not needed) | Zero infrastructure configuration or key-rotation management required. |
| SSE-KMS | Yes | Yes | Generates auditable CloudTrail trails; requires S3 Bucket Keys to prevent scaling throttling limits. |
| DSSE-KMS | Yes | No | Applies two separate layers of CNSA FIPS-compliant encryption at the server side layer. |
| SSE-C | ❌ No | No | Completely hidden from the AWS Console. Can only be initiated programmatically via custom SDK headers or the AWS CLI. |
The DSSE-KMS Compliance Blueprint: Notice that the console exposes an advanced option named DSSE-KMS (Dual-Layer Server-Side Encryption). If you hit an exam scenario where a high-compliance federal defense department client mandates that data-at-rest must be enveloped within two distinct, isolated layers of cryptographic 256-bit Advanced Encryption Standard (AES-GCM) implementations to meet rigorous FIPS frameworks, DSSE-KMS is the textbook managed answer. It eliminates the heavy engineering debt of writing custom client-side encryption blocks while fulfilling the multi-layer security mandate out-of-the-box!