CloudFront Hands On
This hands-on lab covers provisioning an isolated private S3 storage bucket, initializing a modern Amazon CloudFront Distribution bound to that S3 origin, deploying an Origin Access Control (OAC) trust policy to secure data channels, and auditing how Edge caches intercept asset requests to completely eliminate latency overhead.
Hands On
Phase 1: Initialize the Private Data Vault
- Open the Amazon S3 Console and click Create bucket.
- Bucket name: Type
demo-cloudfront-rendy. - AWS Region: Select Sydney (ap-southeast-2).
- Leave all secondary configuration parameters at their absolute default values (ensuring Block Public Access is checked On) and click Create bucket.
- Click into your new bucket, click Upload → Add files, and drop three testing files into the container:
beach.jpg,coffee.jpg, and a basicindex.htmlfile layout. Hit Upload. - The Security Boundary Audit: Click on the
index.htmlfile link, and try to browse directly via its native Object URL string path The browser will immediately block the connection with anAccess Denied (403)error wrapper. Your bucket is perfectly locked down.
Phase 2: Deploy the CloudFront Distribution Framework
- Open a new browser tab and navigate straight to the Amazon CloudFront Console.
- Click Create distribution.
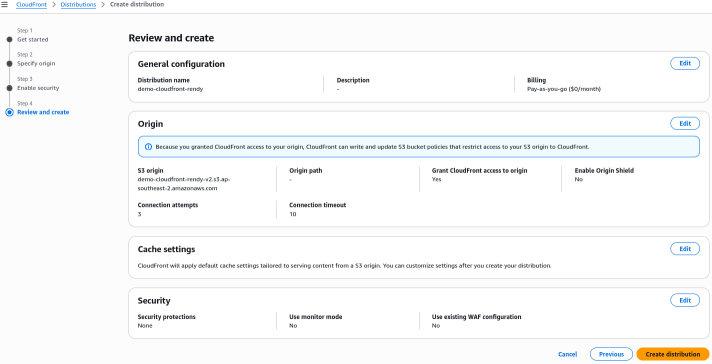
- Name it something unique like
demo-cloudfront-rendy. - Note: If you have a existing Route 53 managed domain, you can optionally attach a custom CNAME alias to your distribution here. For this lab, we will skip that step and just use the default CloudFront domain name.
- Origin Selection: In the Origin domain selection box, click inside the field and select your newly minted
demo-cloudfront-rendyS3 bucket from the automated dropdown selector pool. - Settings: Leave the Allow private S3 bucket access (OAC) checkbox On to automatically update the S3 Bucket Policy to allow CloudFront to access the bucket securely.
- Origin & Cache Settings: Leave the default Origin settings and Cache settings
- WAF Perimeter Setup: For this staging sandbox sandbox loop, toggle the Web Application Firewall (WAF) switch option to Do not enable (saving you firewall execution overhead).
- Scroll to the bottom of the active creation wizard window and click Create distribution.
Phase 3: Check the S3 Bucket Policy
- While the CloudFront distribution is still in the Deploying state, jump back into your S3 Console tab and click into your
demo-cloudfront-rendybucket. - Click the Permissions tab and scroll down to the Bucket Policy editor block.
- The OAC Policy Template: You will see that S3 automatically injected a custom JSON policy statement to allow the CloudFront service principal to read objects out of your bucket securely.
{
  "Version": "2008-10-17",
  "Id": "PolicyForCloudFrontPrivateContent",
  "Statement": [
    {
      "Sid": "AllowCloudFrontServicePrincipal",
      "Effect": "Allow",
      "Principal": {
        "Service": "cloudfront.amazonaws.com"
      },
      "Action": "s3:GetObject",
      "Resource": "arn:aws:s3:::demo-cloudfront-rendy-v2/*",
      "Condition": {
        "ArnLike": {
          "AWS:SourceArn": "arn:aws:cloudfront::747554530150:distribution/EJ4RUF1TWA3P"
        }
      }
    }
  ]
}
Phase 4: Execute Global Retrieval Tracking & Edge Verification
- Toggle back into your CloudFront Distribution Dashboard view window.
- Locate the generated Distribution domain name metadata string parameter and copy it directly to your clipboard layout:
- Open a fresh web browser address bar panel and paste the link. If you hit enter on the raw root domain path, you will catch an expected, default S3 access restriction XML file because no default root index routing was configured.
- The Route Validation Tests: Append the explicit filename paths to the end of your custom CDN endpoint address bar string loop to trace asset retrieval processing:
- Test A:
https://d12345example.cloudfront.net/coffee.jpgSUCCESS! - Test B:
https://d12345example.cloudfront.net/beach.jpgSUCCESS! - Test C:
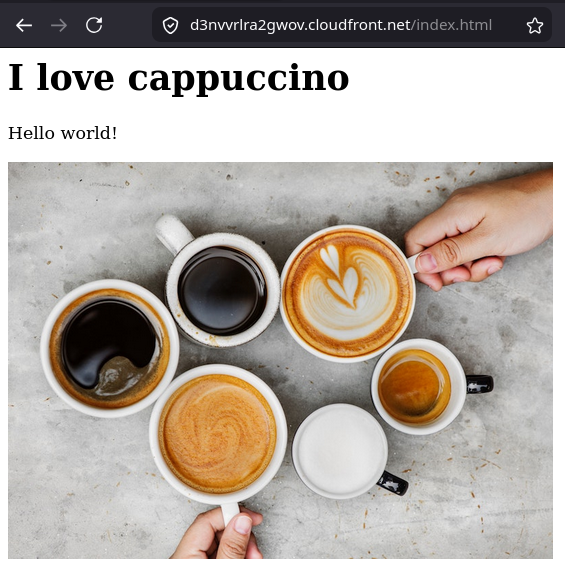
https://d12345example.cloudfront.net/index.htmlTOTAL VICTORY! Your full HTML document loads seamlessly, effortlessly pulling and rendering the accompanying image assets.
- Test A: