Beanstalk Extensions
Every single button, toggle, and environment variable you configure manually in the Elastic Beanstalk UI can be completely automated through code using Elastic Beanstalk Extensions (.ebextensions). By dropping specially formatted configuration files inside a specific directory at the root of your source code bundle, you can inject system environment variables, modify OS-level settings, or even provision extra AWS resources like DynamoDB tables or ElastiCache clusters automatically during your application deployments.
Key Takeaways
Elastic Beanstalk Structure
Phase 1: Local Code Workspace Packaging
- The Root Directory Constraint: You must create a folder named exactly
.ebextensions/at the absolute root of your project directory. If it is hidden inside a subdirectory, Beanstalk will completely ignore it. - File Naming Rules: The configuration files inside
.ebextensions/can be written in either YAML or JSON, but they must end with a.configfile extension (e.g.,environment-variables.config). - The option_settings Block: Inside the
.configfile, you use theoption_settingsnamespace to map out configurations. To define environment variables that your code can read at runtime, you target the specific AWS namespace:aws:elasticbeanstalk:application:environment.
Here is how the YAML file looks under the hood:
option_settings:
  aws:elasticbeanstalk:application:environment:
    DB_URL: 'jdbc:postgresql://production-db.cr7xxxx.ap-southeast-2.rds.amazonaws.com:5432/mydb'
    DB_USER: 'db_admin_bro'
Phase 2: Deploying the Configuration Bundle
- Zipping Root Content: Select the files inside your project directory—including your application scripts (
app.js) and your newly created.ebextensions/folder—and compress them directly into a flat root archive (nodejs-V3-ebextensions.zip). - Console Upload Execution: Navigate to your environment console, click Upload and Deploy, label the application version (e.g.,
MyApplication-EBExtensionsDemo), and submit. Beanstalk extracts the archive, discovers the.ebextensions/block, and immediately adjusts the infrastructure state.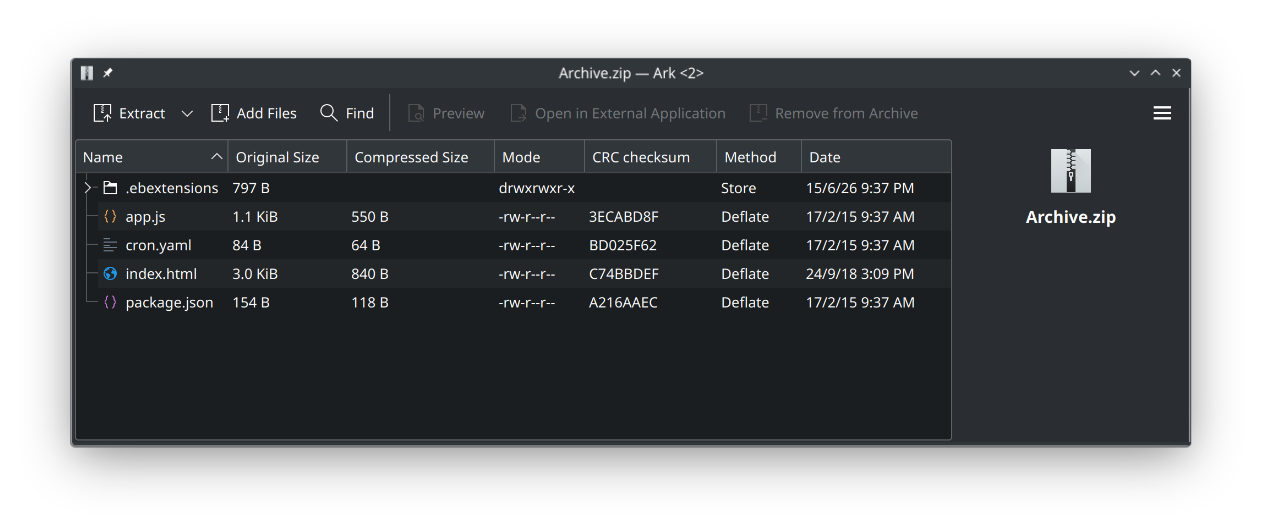
Phase 3: Resource Verification & Lifecycle Binding
- Properties Validation: Once the deployment logs finish processing, navigate to the Configuration dashboard in Beanstalk and scroll down to Environment properties. The keys
DB_URLandDB_USERwill appear pre-populated straight from your code file. - The Lifecycle Trap: You can use these configuration files to spin up raw infrastructure components (like an ElastiCache or a DynamoDB table). However, any AWS resource created inside an
.ebextensionsfile belongs explicitly to that Beanstalk environment. If you terminate the Beanstalk environment, those auxiliary resources are instantly deleted along with it.
Architectural Dependency
                [ Zip File Payload: nodejs-V3-ebextensions.zip ]
                                        │
                                        ▼
                  ┌───────────────────────────────────────────┐
                  │ Elastic Beanstalk Deployment Orchestrator │
                  └─────────────────────┬─────────────────────┘
                                        │
                       (Extracts and Scans Root Directory)
                                        │
                                        ▼
                        ┌──────────────────────────────┐
                        │ Found .ebextensions/ folder? │
                        └──────┬────────────────┬──────┘
                               │                │
                           ( YES )            ( NO ) ──► Standard Code Deploy Only
                               │
                               ▼
               ┌─────────────────────────────────┐
               │ Parses files ending in .config  │
               └───────────────┬─────────────────┘
                               │
         ┌─────────────────────┴─────────────────────┐
         ▼                                           ▼
 [ Option Settings Processed ]             [ AWS Resources Block Parsed ]
         │                                           │
         ▼                                           ▼
Injects Keys into EC2 OS Environment        Provisions Managed Cluster Stack
(e.g., DB_URL, DB_USER)                     (DynamoDB, ElastiCache, etc.)
                                                     │
                                                     ▼
                                      ⚠️ WARNING: Deleting Environment
                                      will destroy these resources!
Exam Tips
- The Exact Folder and File Naming Scheme: The exam loves to test your attention to detail regarding syntax layout. They will give you options like
ebextensions/,.ebextension/, or files namedconfig.yaml. These are all wrong. The folder must have a leading dot (.ebextensions/) and the files must end in .config. - Production Database Best Practice: If a scenario asks where to place a production database when utilizing Beanstalk, never write it inside an
.ebextensionsconfiguration block. Because its lifecycle is chained to the environment, an accidental deletion of the Beanstalk stack will destroy production data. Instead, provision the RDS database independently outside of Beanstalk, and use.ebextensionsstrictly to declare the connection string environment properties.
Practice Test
Question 1: A developer needs to deploy a Python application to AWS Elastic Beanstalk. The application requires three custom OS environment variables to establish a connection to an external database cluster. Additionally, these variables must be version-controlled alongside the application source code. How should the developer configure this? - [ ] Create a file named env.yaml inside a directory named .ebextensions/ at the project root, and declare the keys under the options namespace. - [ ] Create a file ending with .config inside a directory named .ebextensions/ at the root of the source bundle, and define the variables under the aws:elasticbeanstalk:application:environment namespace. - [ ] Define the environment variables directly inside the application's requirements.txt file. - [ ] Use the AWS CLI to manually run aws elasticbeanstalk update-environment commands before running each build pipeline iteration.
Correct Answer
- Create a file ending with .config inside a directory named
.ebextensions/at the root of the source bundle, and define the variables under theaws:elasticbeanstalk:application:environmentnamespace.- Explanation: To bundle configuration settings alongside your application code for source control, you must place a
.configfile within the.ebextensions/root directory and use the correct environment namespace blocks.
- Explanation: To bundle configuration settings alongside your application code for source control, you must place a
Question 2: A startup manages its Cloud resources with Elastic Beanstalk. The environment consists of few Amazon EC2 instances, an Auto Scaling Group (ASG), and an Elastic Load Balancer. Even after the Load Balancer marked an EC2 instance as unhealthy, the ASG has not replaced it with a healthy instance.
As a Developer, suggest the necessary configurations to automate the replacement of unhealthy instance.
- The ping path field of the Load Balancer is configured incorrectly
- Auto Scaling group doesn't automatically replace the unhealthy instances marked by the load balancer. They have to be manually replaced from AWS Console
- The health check type of your instance's Auto Scaling group, must be changed from EC2 to ELB by using a configuration file
- Health check parameters were configured for checking the instance health alone. The instance failed because of application failure which was not configured as a parameter for health check status
Correct Answer
- The ping path field of the Load Balancer is configured incorrectly
- Explanation: Ping path is a health check configuration field of Elastic Load Balancer. If the ping path is configured wrong, ELB will not be able to reach the instance and hence will consider the instance unhealthy. However, this would then apply to all instances, not just one instance. So it does not address the issue given in the use-case.
- Auto Scaling group doesn't automatically replace the unhealthy instances marked by the load balancer. They have to be manually replaced from AWS Console
- Explanation: This statement is incorrect. If the health check type of the Auto Scaling group is changed from EC2 to ELB, Auto Scaling will automatically replace any instances marked as unhealthy by the load balancer.
- The health check type of your instance's Auto Scaling group, must be changed from EC2 to ELB by using a configuration file
- Explanation: By default, the health check configuration of your Auto Scaling group is set as an EC2 type that performs a status check of EC2 instances only. To automate the replacement of unhealthy EC2 instances based on ELB health checks, you must change the health check type of your instance's Auto Scaling group from EC2 to ELB by using a configuration file.
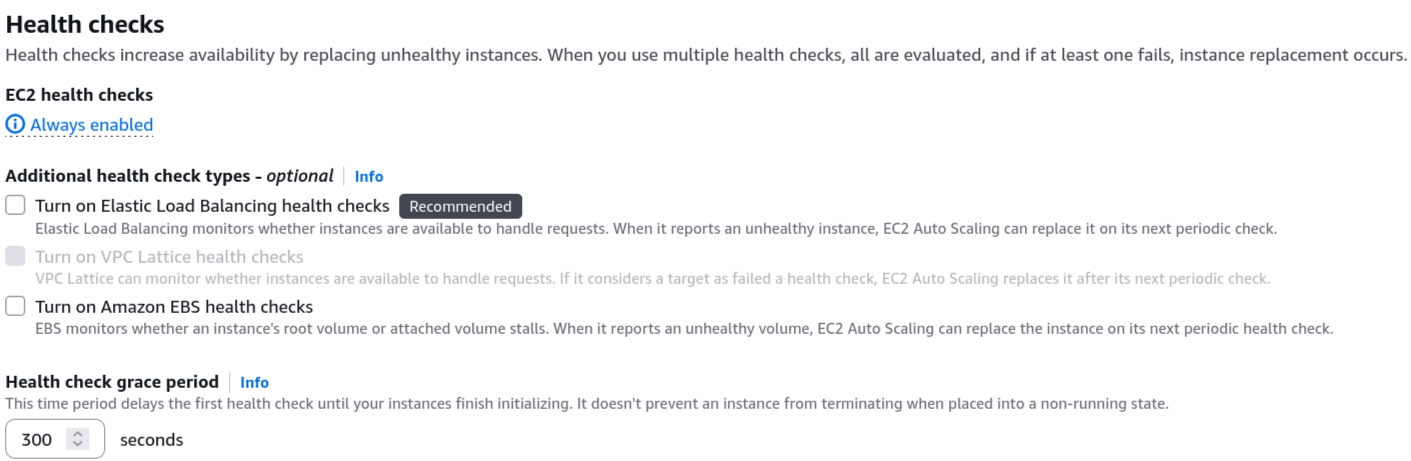
- Explanation: By default, the health check configuration of your Auto Scaling group is set as an EC2 type that performs a status check of EC2 instances only. To automate the replacement of unhealthy EC2 instances based on ELB health checks, you must change the health check type of your instance's Auto Scaling group from EC2 to ELB by using a configuration file.
- Health check parameters were configured for checking the instance health alone. The instance failed because of application failure which was not configured as a parameter for health check status
- Explanation: This is an incorrect statement. EC2 status checks, by definition, cover only the EC2 instance hardware/system health, whereas ELB health checks test the availability of the application running on the instance. Changing the ASG health check type to ELB resolves this exact scenario.