SQS - Queue Access Policy
An SQS Queue Access Policy is a resource-based JSON document attached directly to an SQS queue. Unlike identity-based IAM policies (which dictate what a user or server can do), resource policies dictate who or what is allowed to interact with the queue. This is the absolute requirement for enabling cross-account consumer access or authorizing asynchronous AWS services (like Amazon S3 bucket event notifications) to invoke the sqs:SendMessage API string.
Key Takeaways
The Two Heavyweight Exam Use Cases
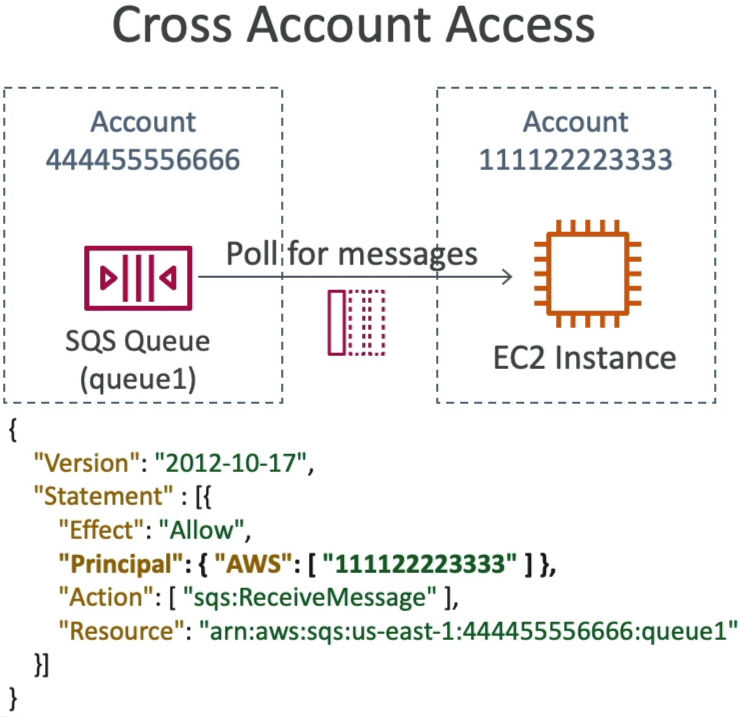
Use Case 1: Cross-Account Processing
- The Architecture: Account A houses an SQS queue (
arn:aws:sqs:...:Main-Queue). An EC2 worker instance running inside Account B needs to pull jobs from it. - The Security Solution: You attach a Queue Access Policy to Account A's queue. The policy sets the
Principalfield directly to Account B's account ID (or a specific worker role ARN) and explicitly grantssqs:ReceiveMessageandsqs:DeleteMessage.
Use Case 2: Amazon S3 Event Distribution
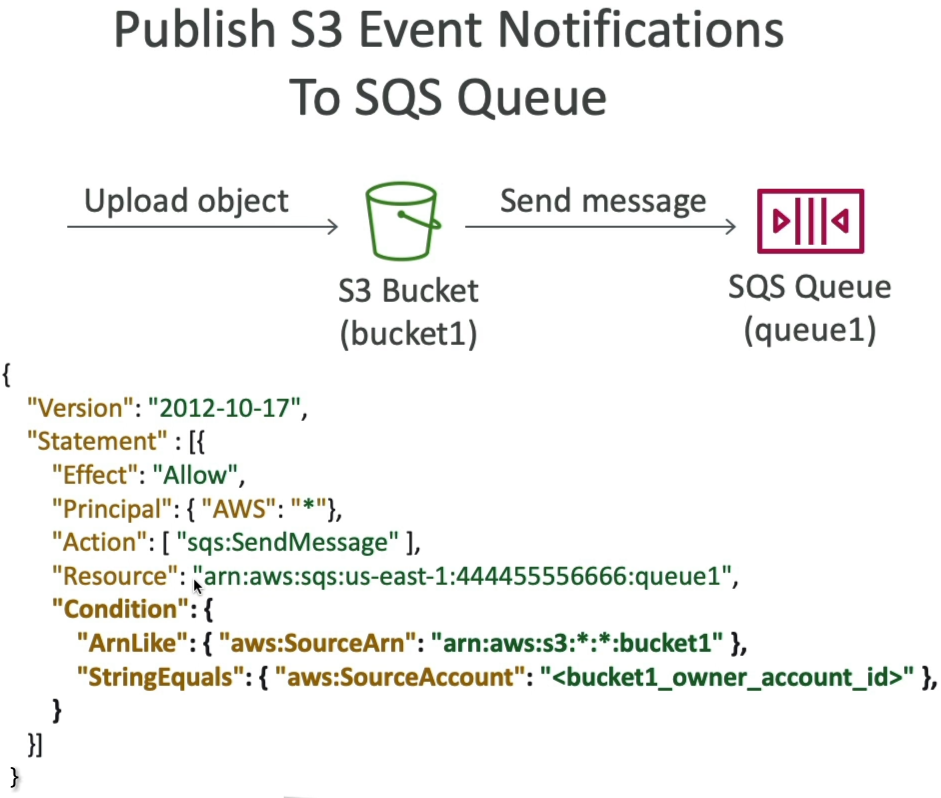
- The Architecture: A developer configures an S3 bucket to trigger a real-time message notification to an SQS queue every single time a user uploads a new file (
s3:ObjectCreated:*). - The Validation Guardrail: If you try to save this configuration on S3 before updating SQS, S3 throws an immediate
Unable to validate the following destination configurationserror block. SQS must have an access policy explicitly allowing the S3 Service Principal (s3.amazonaws.com) to runsqs:SendMessage.
🛠️ Step-by-Step Console Hands-On Playbook
Here is the exact layout to replicate the hands-on event hookup successfully without triggering validation crashes:
Step 1: Setup the Target Queue
- Go to the Amazon SQS Dashboard, click Create queue, select Standard, and name it
EventsFromS3. - Keep all defaults and select Create queue. Copy the global Queue ARN to your clipboard.
Step 2: Provision the Source Bucket
- Open a parallel tab for Amazon S3, click Create bucket, name it uniquely (e.g.,
rendy-sqs-queue-access-policy), and complete provisioning.
Step 3: Update the SQS Advanced Access Policy Shield
- Return to your SQS queue, click Edit, and scroll down to the Access policy block. Flip the radio selector to Advanced.
- Replace the placeholder schema with the specialized JSON structure below, updating the account IDs, Queue ARN, and Bucket ARN with your active values. Hit Save.
Step 4: Activate the S3 Notification Hook
- Head back to your S3 bucket dashboard, click the Properties tab, scroll down to Event notifications, and click Create event notification.
- Select All object create events, set the destination target pointer directly to your SQS queue, and select
EventsFromS3. Hit Save changes (it clears instantly with zero errors!).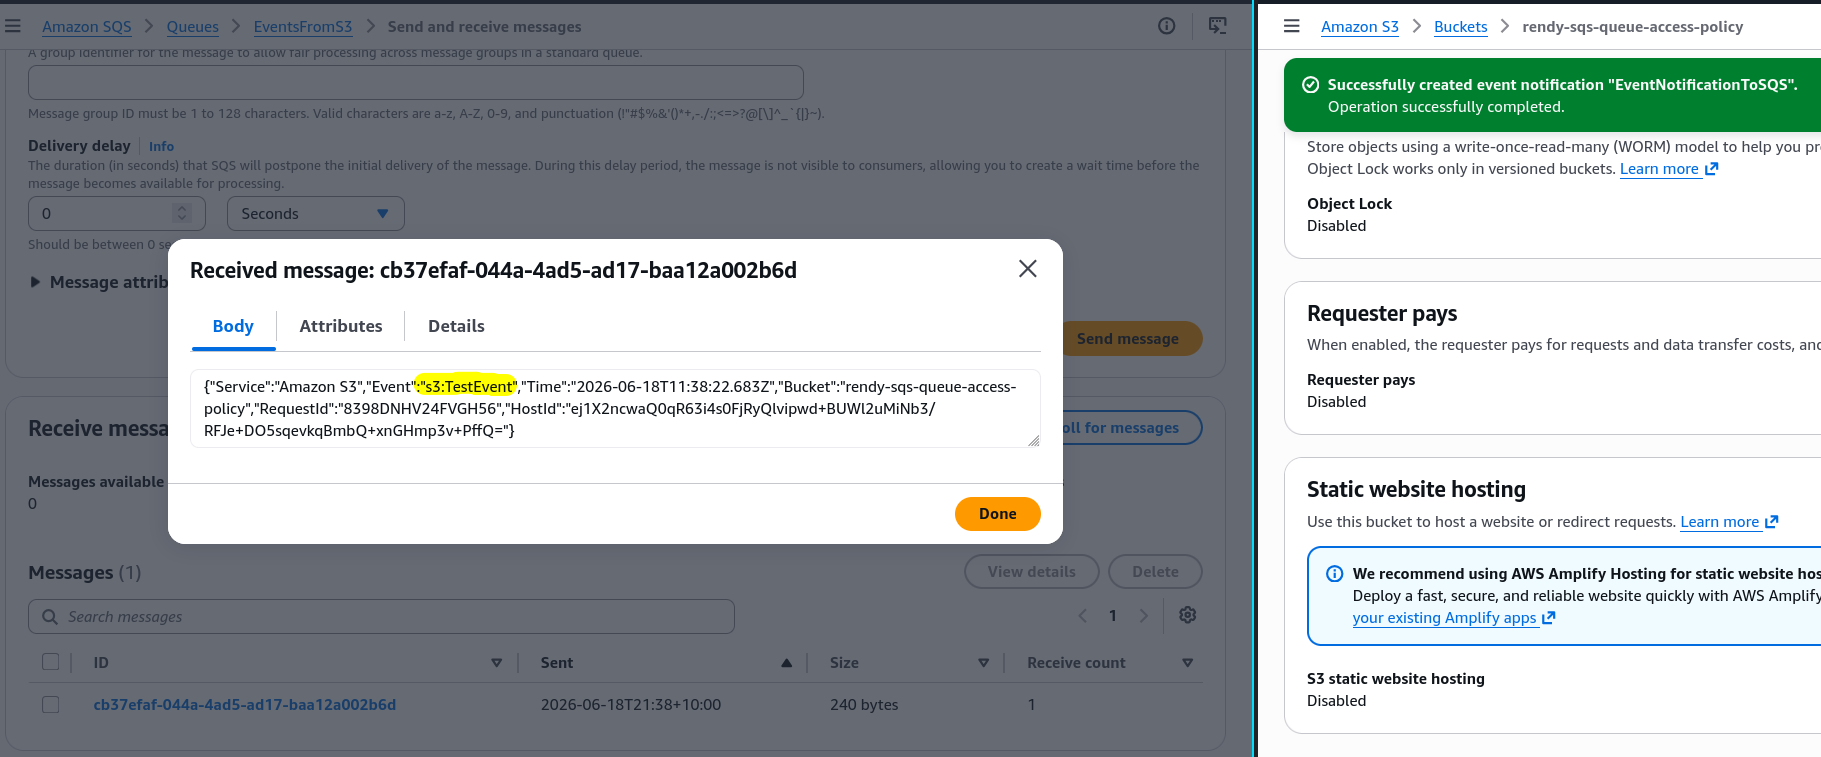
📄 The Production JSON Access Policy Configuration
{
  "Version": "2012-10-17",
  "Id": "example-ID",
  "Statement": [
    {
      "Sid": "example-statement-ID",
      "Effect": "Allow",
      "Principal": {
        "Service": "s3.amazonaws.com"
      },
      "Action": ["SQS:SendMessage"],
      "Resource": "arn:aws:sqs:ap-southeast-2:747554530150:EventsFromS3",
      "Condition": {
        "ArnLike": {
          "aws:SourceArn": "arn:aws:s3:*:*:rendy-sqs-queue-access-policy"
        },
        "StringEquals": {
          "aws:SourceAccount": "747554530150"
        }
      }
    }
  ]
}
Exam Tips
- Bypassing the S3 Destination Error: If a troubleshooting question states that an S3 bucket notification config is crashing with an inability to validate the destination endpoint error, look for the answer stating that the target SQS queue resource policy is missing an explicit
Allowstatement for thes3.amazonaws.comservice principal. - The Least Privilege Condition Principle: For security hygiene, ensure that your Condition block doesn't just check the principal. It must explicitly check
aws:SourceArntargeting your specific bucket name to ensure a separate malicious account cannot abuse the pipeline to flood your queue.