Lambda Concurrency Hands On
Breaking your own serverless application on purpose by setting the Reserved Concurrency to 0 is the ultimate power move to check how your client-side error handling deals with a real-world production breakdown!
Stephane’s console walk exposes two critical platform behaviors: how a hard throttle surfaces instantly when you run out of scaling headroom, and why you can't just slap Provisioned Concurrency onto a dynamic $LATEST code branch.
🛠️ Step-by-Step Concurrency Manipulation Playbook
1. Simulating a Total System Throttle (The Zero Guardrail)
-
Step 1: Locate the Concurrency Allocation Tab
- Inside your
lambda-config-demoworkspace, jump over to the Configuration tab ──► select Concurrency from the sidebar options list. - Review your regional dashboard matrix. It displays your current Unreserved Account Concurrency floor baseline (defaulting to
1,000shared units across your region).- Brand new accounts will show much lower ceilings (often around 10 to 30 instances), it automatically scales up to 1,000 as you use the account normally.
- Inside your
-
Step 2: Apply the Absolute Throttle Boundary
- Hit Edit ──► toggle the allocation switch from unreserved to Reserve concurrency ──► punch in exactly
0as the value parameter, and click Save.
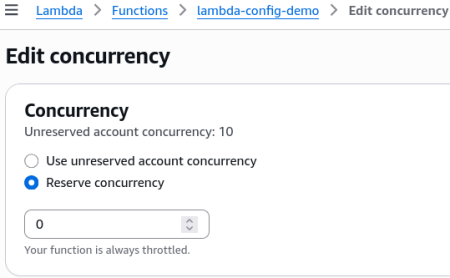
- Hit Edit ──► toggle the allocation switch from unreserved to Reserve concurrency ──► punch in exactly
-
Step 3: Audit the Synchronous Invocation Failure
- Jump directly to the function's Test tab and click the Test execution button.
- The Platform Interception: The execution block instantly locks up and drops a hard red validation error box:
Rate Exceeded / TooManyRequestsException (API Status 429)* Because your available environment instance limit is capped at absolute zero, the data plane drops your request at the front door before a single microVM line can even spin up, bro!
2. Restoring the Pipe and Navigating the $LATEST Restriction
-
Step 4: Restore Account Pool Routing
- Navigate straight back to Configuration -> Concurrency -> Edit ──► switch the toggle back to Use unreserved account concurrency (or set a safe allocation boundary like
20slots) and click Save. - Re-fire your manual console Test button. The code instantly re-engages and returns your successful
prodenvironment context strings flawlessly.
- Navigate straight back to Configuration -> Concurrency -> Edit ──► switch the toggle back to Use unreserved account concurrency (or set a safe allocation boundary like
-
Step 5: The Provisioned Concurrency Pre-Warming Gate
- Scroll down to the Provisioned Concurrency Configurations sub-panel.
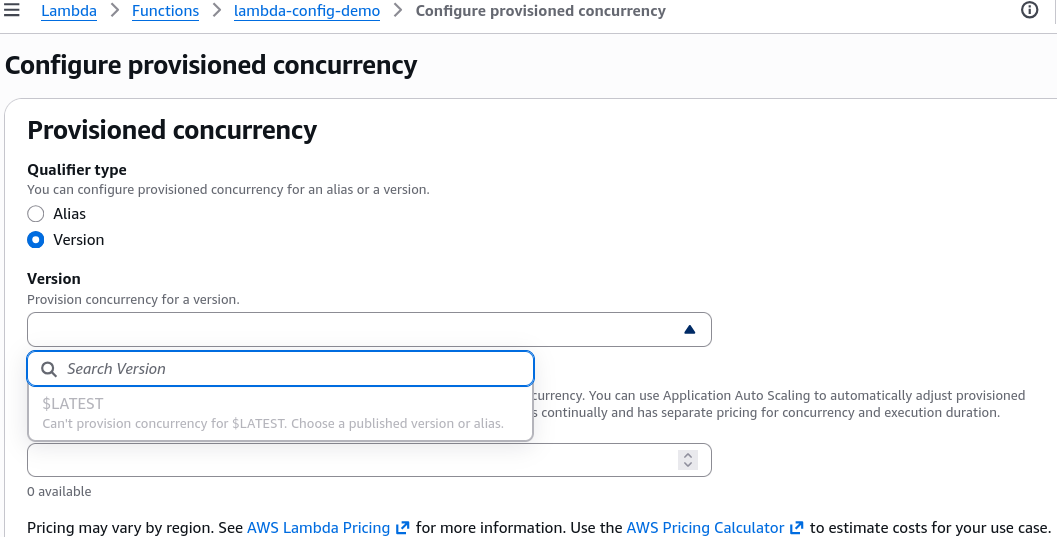
- Click Add configuration. Notice the console immediately forces you to specify either a concrete Function Version or a targeted Function Alias.
- The Strict Platform Trap: The dropdown selector completely blocks you from picking the active
$LATESTdevelopment branch! - Why? Because
$LATESTis highly mutable—you are constantly updating the source code, changing variables, and modifying layer setups. AWS cannot reliably pre-warm and allocate Firecracker microVM environments ahead of time for code that might morph every 5 seconds.
Exam Tips
- The Chaos Engineering Mock Pattern: If an exam scenario asks you how a quality assurance team can quickly mock out a sudden downstream system outage or test an internal application's graceful degradation retry logic without rewriting a single line of microservice source code—look straight for the answer that suggests setting that targeted function's Reserved Concurrency value directly to 0 in the AWS Management Console or via the CLI.
- The Version Publishing Pipeline Flow: If a deployment scenario complains that a developer's cloud automation pipeline is failing to attach a Provisioned Concurrency pre-warming rule right after updating a function's code wrapper, remember the architectural sequence: You must execute a
lambda:PublishVersionAPI call first. You can only bind pre-warmed provisioned environments to immutable published snapshots (likeVersion 1,Version 2) or named tracking Aliases pointing to them!